Big. Heavy words. Weighted. Always hard to say the first time, especially when you put SO MUCH of yourself into THOSE WORDS. I love you. It's simple and so difficult. It's freeing and all-consuming. Love is beautiful. Yet, SO MANY OF US (myself included) are so uncomfortable with these three, beautiful, amazing words.
Our parents never told us, "I love you." Not my parents. Not my husband's parents. I don't remember if we made a conscious choice to be different (very possible); but, it definitely happened organically that we have no trouble telling each other and our children, "I love you", many times per day. It's a wonderful feeling to know that we are loved and that WE LOVE EACH OTHER. I know that people outside of our home and outside of our nuclear family love us, too. That is where cultural "norms" make it harder (I think) to accept the, "I love you" received from friends and extended family (or from the daughter/granddaughter/niece/aunt) that may or may not hear it in return. It is also harder to voice our emotion, not knowing what is expected (just like in any relationship). Anyone else hate "norms"?
We know that we SHOULD love everyone, even our enemies, right? So, why is it so hard to EXPRESS our emotion? Is it seen as a sign of weakness? LOVE IS POWERFUL. Why would showing LOVE be seen as weak? I get it. I know. It makes us vulnerable. We are not sure if we will be loved in return.
Well, I am here to tell you that, VULNERABLE is the BEST place I have EVER been. Really. It wasn't until I opened myself up to LOVING someone else (my husband, then again with each child), that I could TRULY experience WHAT LOVE IS. I am still on my journey, and I am still enjoying what LOVING OTHERS does for me! Sorry if this sounds selfish.
Each day/month/year, with the people I truly feel love toward, I take a "leap" and tell them that I love them. I did not realize I was doing this until looking back. But, the more I do it, the better it feels. It usually starts in writing (that's easier...and, a little cowardly, I know); and, then, I drum up the courage to say it on the phone. Eventually, I can more easily say it in person. I still don't know why it is so hard. But, I keep going.
Maybe, someday, I will be telling everyone, "I love you." Starting now. Consider yourself loved. By me. Just for reading this. Thank you. I love you.
Tuesday, January 7, 2014
Wednesday, January 1, 2014
Happy New Year!
Instead of "resolutions", per se, we like to make incremental changes toward what we imagine for our lives. I love the "fresh slate" feeling that a new year provides. My goal as mother and COO of our household is, ultimately, to enable us all to be happy and healthy and to never stop learning.
Personally, I have a goal of drinking more tea in 2014. I just love the warm, nourishing mug and the time I take to sit and drink it (even if it is just five minutes).
We also want to make sure, even when it is cold, to get outside every day.
As a family, we are trying to ensure we spend special time with each child, to give us one-on-one time (for them and for us, for school/learning, for fun and, for love).
We also want to have a more specific budget for once-a-year expenses, like license plate stickers and Christmas presents, instead of relying on our "emergency" funds for these already-anticipated expenses.
We are also saving for a road trip that we were not able to take in 2013, visiting many of our family members (and some friends) along the way.
My 7yo said he "wants to save his money this year" (he gets $1/week allowance). I think he changed his mind a few minutes after he made the declaration.
We are grateful for the abundance we already enjoy; and, we look forward to what this year has in store. Happy New Year!
Monday, December 30, 2013
A Gingerbread House? What were we thinking?
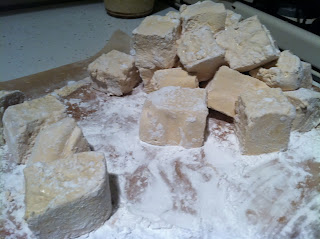
First, I would like to mention that this process took lots of planning. After deciding THIS was the year that we would attempt to make a gingerbread house (my oldest son has been requesting one for at least three years), I started thinking about when would be the best time to make it. Then, there are not many places to get candy around here (without HCFS and artificial colors and flavors); so, we had to order some. THEN, my son HAD to have marshmallows. So, we decided to make some one day. We found the recipe at, http://urbanposer.blogspot.com/2012/11/rustic-homemade-marshmallows-whoney.html; and, it was a little intimidating at first (from the mom who totally messed up the rock candy for the science experiment). But, it turned out to be easier than we thought.
Honey-Cinnamon Marshmallows

We did not use a "traditional" gingerbread house icing. We used a buttercream frosting that we knew would taste yummy:
Gingerbread Buttercream Frosting (aka "Glue")
3 c. organic powdered sugar
1/3 c. organic butter, softened
1 t. vanilla extract
1 t. lemon zest
3-4 T. organic goat milk (we can't drink cow's milk)
Beat powdered sugar, butter, extracts and flavoring in a bowl. Gradually stir in enough milk to achieve desired consistency.
These are the items we put on it: all natural gummy stars (from Whole Foods), Yum Earth Organics hard candies, all natural candy canes (purchased from Abe's Market), dark chocolate raisins, our marshmallows (see above) and organic coconut (aka "snow").
Here is our MASTERPIECE (at least it tasted yummy)! It was SO HARD to get it to stay standing! Both boys were holding the sides while I tried to assemble the roof (with VERY sticky hands by then) AND THEN I discovered that the side walls needed to be outside the front/back walls because otherwise, the roof would not stay (more stickiness as I shifted them). ARGH! Ah. There. It stayed. Then, we carefully placed the chimney and some candies and "shored up" the sides with our XL marshmallows. Ta DA!
My 7yo said when we practice every year, we will get better at it. Ummm. Yes. Ok. Maybe.
It was worth it. Every memory and every bite. YUM! Ok, I will do it again. LOL.


Honey-Cinnamon Marshmallows
1 c. filtered water (split into half cups)
2 1/2 T. of Knox gelatin (the "urban poser" used Great Lakes brand)
1 c. organic light colored honey or maple syrup or half of each (we just used honey)
1 t. vanilla extract
1/4 t. salt
optional: Arrowroot starch to coat
Grease an 8×8(or larger) pan and line with parchment paper in both directions. Leave some length to use as handles when removing your finished marshmallows. Grease the parchment paper again and sprinkle with a layer of arrowroot starch or other coating of choice.
In your mixer bowl, sprinkle the gelatin evenly over 1/2 cup of water. Allow to "bloom" for about 10 minutes.
While the gelatin is blooming, pour the other 1/2 cup of water in a sauce pan along with the honey/maple syrup and the salt. Turn the burner on at a medium to medium high heat. Bring the mixture to a boil (watch it because it could foam over the top). Place candy thermometer in the pan and continue to boil until mixture reaches 240 degrees (soft ball stage: a drop of the syrup in ice water forms a pliable ball). This could take anywhere from 10-40 minutes.
If using a standing mixer set it to medium. Pour the honey/syrup mixture into the bowl a steady stream, combining it with the softened gelatin. Avoid pouring it directly on to the beaters or the syrup will splatter and hit you or the sides of the bowl. Pouring somewhat slowly is also very important, otherwise the sugar syrup will be too hot when it hits the gelatin causing the marshmallow mixture to break later when you try to spread it.
Turn the mixer to high and continue beating until it triples in volume, becomes light in color and the bowl is more or less cool to the touch (this can be anywhere from 5-10 minutes depending on your beaters). Times WILL vary! Add the vanilla and continue to beat a minute or two more, giving it enough time to mix in completely. If adding spices, now is the times to add those as well. When the marshmallow cream is sufficiently whipped it has good volume and holds its shape for a moment before falling back on itself when scooped up with the beaters.
Turn off the mixer and transfer the marshmallow cream to the prepared pan. Smooth out the top with a pallet knife or back of a spoon, again, working quickly before it begins to set. Remember, if using a coating (such as arrowroot), add a light sprinkling to the bottom of the pan first before transferring the marshmallow cream. Sprinkle starch evenly over the top and pat down if needed.
If you are not using a coating then lightly grease your hands with oil and pat smooth. This will help keep the marshmallow cream from sticking to your fingers. Allow anywhere from 4-6 hours, this could take less time depending on the temp of the syrup. If you want them to look nice and clean after cutting I recommend waiting at least 4 hours, even if they seem set, as they will be wet inside.
Other coating options: Try all kinds of crushed nuts, coconut, almond flour mixed with spices, cocoa or other starches.
When set, remove the marshmallows by lifting from the parchment paper flaps. Cut to desired size and shapes. Add more coating while cutting if needed and toss them again in some starch once cut for a super nice finish.
Enjoy! Mmmm.


Next up, designing the gingerbread house. We were inspired by the blog we found the recipe we used for our GLUTEN FREE gingerbread house; but, um, hers was ALOT fancier (check it out at, http://simplygluten-free.com/blog/2010/12/gluten-free-gingerbread-house.html). We did not want to be fancy (but, my 7yo DID ask for a chimney). We just wanted it to TASTE GOOD and REMAIN STANDING. So, one night, we measured and cut out the shapes needed for our gingerbread house.
THEN, finally, the day came that I made the gingerbread dough and the frosting. THEN, the next day I rolled (ARGH that stuff is HARD) and cut out, then baked the pieces. THEN, the following day, it was time to CONSTRUCT the gingerbread house. WOO HOO! (Whew!)
Here are the other two recipes we used:
Gluten Free Gingerbread House Recipe (we cut this recipe in half)
4 c. superfine brown or white rice flour
1 1/3 c. superfine sweet rice flour (I had to sub more brown rice flour)
1 1/3 c. potato starch
1 1/3 c. millet flour
8 t. xanthan gum
1 t. baking soda
1/2 t. baking powder
1 1/2 t. kosher or fine sea salt
4 t. ground ginger
4 t. ground cinnamon
1 t. ground cloves
1 c. unsalted butter
1 c. organic dark brown sugar
2 large eggs
1 1/2 c. organic molasses
In a large mixing bowl whisk together the rice flour, sweet rice flour, potato starch, millet flour and xanthan gum. Take out 1 cup of the flour for kneading and rolling.
To the remaining flour add the baking soda, baking powder, salt, ginger, cinnamon and cloves.
In the bowl of an electric mixer, preferably fitted with a paddle attachment, cream the butter with the dark brown sugar. Add the eggs, one at a time, mixing well after each addition. Beat in the molasses. Turn the mixer to low and gradually add the flour, mixing just until combined. Dust a work surface with some of the reserved flour and put the dough on top. Knead the dough until it is easy to work with and no longer sticky, adding flour as needed. Divide the dough into three portions, wrap with plastic wrap and refrigerate for 1 hour. Can be made up to 3 days ahead and kept in the fridge.
Preheat oven to 350 degrees.
Remove dough from fridge and place on parchment paper and roll out 1/4 inch thick. Cut into the shape of the gingerbread house templates and place the dough pieces along with the parchment paper on thick, flat baking sheets. Bake for 15 minutes or until just starting to color and it feels firm to the touch.
Let pieces cool on the pans. Assemble into house using icing as glue. Decorate as desired.
We did not use a "traditional" gingerbread house icing. We used a buttercream frosting that we knew would taste yummy:
Gingerbread Buttercream Frosting (aka "Glue")
3 c. organic powdered sugar
1/3 c. organic butter, softened
1 t. vanilla extract
1 t. lemon zest
Beat powdered sugar, butter, extracts and flavoring in a bowl. Gradually stir in enough milk to achieve desired consistency.
These are the items we put on it: all natural gummy stars (from Whole Foods), Yum Earth Organics hard candies, all natural candy canes (purchased from Abe's Market), dark chocolate raisins, our marshmallows (see above) and organic coconut (aka "snow").
Here is our MASTERPIECE (at least it tasted yummy)! It was SO HARD to get it to stay standing! Both boys were holding the sides while I tried to assemble the roof (with VERY sticky hands by then) AND THEN I discovered that the side walls needed to be outside the front/back walls because otherwise, the roof would not stay (more stickiness as I shifted them). ARGH! Ah. There. It stayed. Then, we carefully placed the chimney and some candies and "shored up" the sides with our XL marshmallows. Ta DA!
My 7yo said when we practice every year, we will get better at it. Ummm. Yes. Ok. Maybe.
It was worth it. Every memory and every bite. YUM! Ok, I will do it again. LOL.


Thursday, December 19, 2013
The GREAT Compromise
We visit my dad at least a couple of times per week; and, we (now) have to ring a doorbell to enter his wing at his care facility. I was getting tired of having my boys fight and race each other to ring the doorbell (I really don't understand the appeal) OR ringing the doorbell twice, possibly annoying the nurses answering the door. So, I told them one time that they had to decide who was going to ring the doorbell BEFORE they got to the door.
One day, as we were walking down the hall toward the door in my dad's wing, my youngest remembered this "rule". So, he started trying to convince my oldest why he should ring the doorbell. It ended up that my 4yo had to give something to my 7yo in EXCHANGE for ringing the doorbell. So, they both agreed that was what would happen.
After we left my dad's wing, my 7yo remembered that his brother needed to give him something. (Please note that we give the kids multivitamins every day; and, we got one they did not like. I had tried (and failed) to return them; so, I told the boys we would have them every other day so they don't go to waste. Then, one day, we were down to one of each--one they liked and one they didn't like; so, I told them what to expect the next day.) So, I suggested he could give up some of his "electronic minutes" (earned from chores); but, he paused and thought for a moment. My 4yo then told my 7yo that "he would take the "bad" vitamin tomorrow". Wow, great idea, buddy! Then, I asked my 7yo if he agreed.
Number one, I was impressed that he remembered. Number two, I was impressed that he KNEW he was giving my 7yo something good. And, number three, I WISH it was like that all the time. It is not. But, a mom can dream, right?
I am just grateful for this one GREAT compromise. And, I am hoping to continue to enable my kids to make more in the future.
It's a Stage (of Grief)
I knew my family was "off". I knew we were readjusting to having a house of 4, instead of a house of 5 (or often more, with my father's other caregivers). I knew my 4 year old was acting out because he was readjusting.
I just could not put my finger on what we were experiencing. Until now. We were grieving.
My family went through a period of grief when we moved my dad out. That is why it did not feel like a relief. We were still heavy with grief. It was a change for the better; and, that is why we made it. But, we were grieving the loss of a family member (living in our home). It was a different kind of grief because, thankfully, my dad is still alive. But, it was still grief.
It honestly feels good to have recognized it. We have been feeling "lighter" in the last few weeks; and, that is when my husband and I started realizing what we went through.
Whew. Now, we are able to better feel the gratitude for not having to care for Dad around the clock. We are better able to be silly, to feel joy. It was really weighing on us (possibly for longer than I realize).
Today, I feel grateful, lighter and happier. I can see it in my husband and our children, too. Thank you, God.
Wednesday, December 11, 2013
Anticipating the Momentous
I overheard my 7-year-old son playing with his "space guys" (Star Wars hand-me-downs); and, I was surprised at his use of the word, "torture." I asked him where he heard, saw or read that. He "did not remember."
My mind went into all different directions. I was thinking about this show I watch on my computer, called, "Scandal", and how I hate watching what they portray as torture. I was also thinking about all of the beautiful things Nelson Mandela taught us in his lifetime--all the amazing things he did without violence. Which also brought to mind what Martin Luther King, Jr., taught/preached/did in his life without violence (and why he chose that way).
I just can't help thinking that some people want to be able to control what happens to them and their families (and their country) SO BADLY that they would hurt someone to protect someone else. I just can't help thinking that doesn't make sense.
I don't know what the answer is when someone is trying to hurt you or someone you love. I don't know what we are SUPPOSED to do. I don't know what I would do. I know that I would not know how to live with myself either way (letting something happen to someone I love OR hurting someone else).
It hurts enough when I make a mistake with words, which is a passive form of HATE/violence. In our divided country, we have not come very far from the age of Julius Caesar.
My sons and I are reading from, "The Story of the World"; and, we just finished the chapter about how the Senate of Rome wanted to make sure Julius Caesar did not become "too powerful". Former friends of Caesar (members of the Senate) plotted to kill him and succeeded.
I can't be the only one seeing how similar this is to what is happening in our country today. Our nation is divided and many people in our government are plotting against our leader. Is it possible that they think President Obama will become "too powerful"? I don't know. What I have witnessed is hate and division. Throughout history, countries divided NEVER win. History repeats itself.
It is in that spirit that I am still hopeful.
Thinking about life in terms of Jesus (as in, "what would Jesus do?"), I don't believe he would choose hate with words or actions/violence. Look what He did for us. LOOK what he did for us.
In this season of advent, I am looking forward to a world without violence. I am anticipating a world without war. I am dreaming of Christ's momentous return. I feel His time is near.
After all, the next chapter in "The Story of the World" (after the chapter describing the reign of Augustus Caesar) is, "The birth of Christ". We decided to wait until the week before Christmas to read it.
Merry Christmas, everyone!
Friday, November 29, 2013
REAL Comfort Food
Whenever someone uses the term, "comfort food", I think of food that makes me feel good physically and mentally. But, I think many people use the term (including me, at one time!) to describe food that makes them "comfortable" mentally (for various reasons, mostly what we grew up eating/what our mothers made), EVEN THOUGH it makes us feel very UN-comfortable physically (i.e., bloating, indigestion, heartburn). Our senses of taste and smell are most closely linked to our memories; so, that makes sense. But, I think we need to try to still eat amazing, decadent "comfort" food AND be healthy/feel good.
Everyone's body is different. Everyone needs to find out (trial and error is really the BEST way) what foods make them feel UN-comfortable.
I did not notice how badly some food was making me feel until I HAD to pay attention. I was told by my doctor (over 3 years ago, now) that I should try eating gluten free for 2-3 weeks and then try gluten and see what happens. Whoa! When I ate gluten after eliminating it from my system, my body REACTED (sinuses filled up, major gastrointestinal discomfort and 3 DAYS of pea-soup thick fatigue...ugh!). I have tentatively tried it a few times over the last few years, only to have the same reaction. Pretty sure my body ATTACKS gluten as if it were invading (aka allergic reaction)!
The other gastrointestinal health problems I have had over the past year have brought to light more things to which my body is sensitive: chocolate (that's a really hard one for me), cow's milk (lactose, mostly), tomatoes, peppers, white potatoes, eggplant, and tomatillos (these are all in the same plant family-nightshades; and, these are also hard because this is everything my Mexican husband uses to cook).
The best compliments I have gotten for my cooking are from friends who say, "That was so good; and, I feel so good after eating it!" Yes! That's my goal!
So, what does my family eat? I have learned a lot about what we can eat by trial and error (my kids have sensitivities, too! Our kids are often allergic to the same things as their parents). But, I have also learned by reading. I now know that butter, brie, camembert and many hard cheeses (even made with cow's milk) do NOT have lactose (and, my body is fine with them, too!). We go for organic and sheep's milk and goat's milk hard cheeses as often as possible for the added nutrients/environment-friendly/easier-proteins-to-digest aspects.
My oldest son wanted something "thanksgiving-y" for breakfast on Thanksgiving morning. So, the night before, I made an orange-cranberry bread (which I used to make with gluten). I found this awesome recipe for Paleo Cranberry Orange Bread a few weeks ago at, theholisticmama.com. When we had it in the morning, it tasted like pound cake with cranberries in it! Decadent AND makes us feel so good! I am serious. It is SO GOOD.
For our Thanksgiving dinner, I also made some gluten free artisan bread the night before (because as hard as I tried to NOT WANT stuffing, I WANTED STUFFING!). I cubed and toasted the bread in the morning. I used a new stuffing recipe because I wanted something different and it WAS SO SUPER YUMMY, I have to share (please see below). I also got a turkey (I would like to try this dry-brine method; but, until I feel like changing, I just massaged it with butter and spices and roasted it breast DOWN at 425 for 20 minutes, then at 325 for the rest of the baking time. I never baste and it has always come out perfect. Phew.). We also had green beans with bacon, roasted sweet potatoes, salad and cranberry bars (recipe also below) and a GF pie my sister brought. My sister also brought a selection of hard cheeses and GF crackers, which we had with some kielbasa and vegetables for lunch.
Paleo Cranberry Orange Bread
Here is my version (I omitted the Young Living Orange Essential Oil and added organic agave nectar instead of maple syrup). I was going to take a picture for you; but, we gobbled up all but two pieces. So, I took a picture of myself eating one of the last pieces. LOL.
4 free-range eggs, beaten
1/4 c. organic coconut oil, melted
1/4 c. canned organic coconut milk (classic, full fat)
1/3 c. organic agave nectar
1/2 c. fresh squeezed orange juice (we actually used tangerines)
1 t. organic vanilla extract
1/2 c. organic coconut flour, sifted
1 t. baking soda
1/2 t. sea salt
1 c. fresh organic cranberries, chopped or halved
Preheat oven to 350 degrees. Mix together the wet ingredients and add the dry ingredients and stir until combined. Fold in the fresh cranberries. Pour batter into loaf pan greased with coconut oil. Bake for 1 hour or until loaf is set and a toothpick comes out clean. Enjoy! I did!

Cranberry Bars
(These were so good, I had 2 for dessert and 2 with breakfast!)
I found this recipe at elanaspantry.com, one of my favorite GF blogs.
1 c. raw pecans
5 organic medjool dates, pitted
1 T. grapeseed oil or vegan shortening (I used a bit of coconut oil and a bit of organic Earth Balance)
¼ t. celtic sea salt
6 c. fresh organic cranberries, picked over (discard bad ones, i.e. squishy or blackened)
1 c. agave nectar or honey (I used up a jar of honey and also used agave nectar to equal 1 cup)
1 T. orange zest (I used tangerine zest)
Place pecans and dates in food processor and blitz until coarsely ground. Pulse in oil and salt until mixture begins to form a ball. Press crust into a greased 8 x 8 inch baking dish. Bake at 350° for 8-12 minutes until lightly browned.
To make cranberry topping, place 4 cups cranberries, agave and orange zest in a pot on the stove. Bring mixture to a boil, then cover and reduce to a simmer 10-15 minutes, until cranberries start to dissolve. Add remaining 2 cups cranberries and cook covered for 5 more minutes. Remove mixture from heat and allow to cool for 10 minutes. Pour mixture over pecan crust.
Allow bars to set for 60-90 minutes. (I refrigerated overnight). Cut in squares and ENJOY!

3 carrots , chopped into 1-inch pieces
1 stick (1/2 cup) organic unsalted butter , cut into 8 T.
1/2 c. dry white wine (we had an open bottle of pinot noir that I used)
1 large organic green apple, peeled, seeded, cut into 1-inch pieces
1 c. organic walnuts, coarsely chopped
1/2 c. organic raisins
2 c. of water (what we used, based on the amount of bread we had)
3 organic free range eggs (I can't make stuffing without eggs)
1 fresh lemon, squeezed for juice
1 T. dried thyme
2 t. kosher salt
2 t. cracked pepper


Everyone's body is different. Everyone needs to find out (trial and error is really the BEST way) what foods make them feel UN-comfortable.
I did not notice how badly some food was making me feel until I HAD to pay attention. I was told by my doctor (over 3 years ago, now) that I should try eating gluten free for 2-3 weeks and then try gluten and see what happens. Whoa! When I ate gluten after eliminating it from my system, my body REACTED (sinuses filled up, major gastrointestinal discomfort and 3 DAYS of pea-soup thick fatigue...ugh!). I have tentatively tried it a few times over the last few years, only to have the same reaction. Pretty sure my body ATTACKS gluten as if it were invading (aka allergic reaction)!
The other gastrointestinal health problems I have had over the past year have brought to light more things to which my body is sensitive: chocolate (that's a really hard one for me), cow's milk (lactose, mostly), tomatoes, peppers, white potatoes, eggplant, and tomatillos (these are all in the same plant family-nightshades; and, these are also hard because this is everything my Mexican husband uses to cook).
The best compliments I have gotten for my cooking are from friends who say, "That was so good; and, I feel so good after eating it!" Yes! That's my goal!
So, what does my family eat? I have learned a lot about what we can eat by trial and error (my kids have sensitivities, too! Our kids are often allergic to the same things as their parents). But, I have also learned by reading. I now know that butter, brie, camembert and many hard cheeses (even made with cow's milk) do NOT have lactose (and, my body is fine with them, too!). We go for organic and sheep's milk and goat's milk hard cheeses as often as possible for the added nutrients/environment-friendly/easier-proteins-to-digest aspects.
My oldest son wanted something "thanksgiving-y" for breakfast on Thanksgiving morning. So, the night before, I made an orange-cranberry bread (which I used to make with gluten). I found this awesome recipe for Paleo Cranberry Orange Bread a few weeks ago at, theholisticmama.com. When we had it in the morning, it tasted like pound cake with cranberries in it! Decadent AND makes us feel so good! I am serious. It is SO GOOD.
For our Thanksgiving dinner, I also made some gluten free artisan bread the night before (because as hard as I tried to NOT WANT stuffing, I WANTED STUFFING!). I cubed and toasted the bread in the morning. I used a new stuffing recipe because I wanted something different and it WAS SO SUPER YUMMY, I have to share (please see below). I also got a turkey (I would like to try this dry-brine method; but, until I feel like changing, I just massaged it with butter and spices and roasted it breast DOWN at 425 for 20 minutes, then at 325 for the rest of the baking time. I never baste and it has always come out perfect. Phew.). We also had green beans with bacon, roasted sweet potatoes, salad and cranberry bars (recipe also below) and a GF pie my sister brought. My sister also brought a selection of hard cheeses and GF crackers, which we had with some kielbasa and vegetables for lunch.
Paleo Cranberry Orange Bread
Here is my version (I omitted the Young Living Orange Essential Oil and added organic agave nectar instead of maple syrup). I was going to take a picture for you; but, we gobbled up all but two pieces. So, I took a picture of myself eating one of the last pieces. LOL.
4 free-range eggs, beaten
1/4 c. organic coconut oil, melted
1/4 c. canned organic coconut milk (classic, full fat)
1/3 c. organic agave nectar
1/2 c. fresh squeezed orange juice (we actually used tangerines)
1 t. organic vanilla extract
1/2 c. organic coconut flour, sifted
1 t. baking soda
1/2 t. sea salt
1 c. fresh organic cranberries, chopped or halved
Preheat oven to 350 degrees. Mix together the wet ingredients and add the dry ingredients and stir until combined. Fold in the fresh cranberries. Pour batter into loaf pan greased with coconut oil. Bake for 1 hour or until loaf is set and a toothpick comes out clean. Enjoy! I did!

Cranberry Bars
(These were so good, I had 2 for dessert and 2 with breakfast!)
I found this recipe at elanaspantry.com, one of my favorite GF blogs.
1 c. raw pecans
5 organic medjool dates, pitted
1 T. grapeseed oil or vegan shortening (I used a bit of coconut oil and a bit of organic Earth Balance)
¼ t. celtic sea salt
6 c. fresh organic cranberries, picked over (discard bad ones, i.e. squishy or blackened)
1 c. agave nectar or honey (I used up a jar of honey and also used agave nectar to equal 1 cup)
1 T. orange zest (I used tangerine zest)
Place pecans and dates in food processor and blitz until coarsely ground. Pulse in oil and salt until mixture begins to form a ball. Press crust into a greased 8 x 8 inch baking dish. Bake at 350° for 8-12 minutes until lightly browned.
To make cranberry topping, place 4 cups cranberries, agave and orange zest in a pot on the stove. Bring mixture to a boil, then cover and reduce to a simmer 10-15 minutes, until cranberries start to dissolve. Add remaining 2 cups cranberries and cook covered for 5 more minutes. Remove mixture from heat and allow to cool for 10 minutes. Pour mixture over pecan crust.
Allow bars to set for 60-90 minutes. (I refrigerated overnight). Cut in squares and ENJOY!

Gluten Free Sweet & Savory Stuffing
I googled "gluten free stuffing" and found this one that I wanted to try, http://www.oprah.com/food/Gluten-Free-Stuffing#ixzz2m3MVil6g; but, I omitted and adjusted a bit.
1 loaf cubed gluten-free bread (I made my own GF artisan loaf from "Artisan Bread in 5 minutes a day")
6 oz. mild Italian sausage (we can only tolerate a little garlic)
1/3 c. and 4 Tbsp. extra-virgin olive oil (we used a little expeller pressed grapeseed oil, too)
2 small celery ribs, chopped into 1-inch pieces3 carrots , chopped into 1-inch pieces
1 stick (1/2 cup) organic unsalted butter , cut into 8 T.
1/2 c. dry white wine (we had an open bottle of pinot noir that I used)
1 large organic green apple, peeled, seeded, cut into 1-inch pieces
1 c. organic walnuts, coarsely chopped
1/2 c. organic raisins
2 c. of water (what we used, based on the amount of bread we had)
3 organic free range eggs (I can't make stuffing without eggs)
1 fresh lemon, squeezed for juice
1 T. dried thyme
2 t. kosher salt
2 t. cracked pepper
To make bread cubes: Place bread in a large bowl and add 4 tablespoons of olive oil. Using your hands, mix everything together well. Place the bread cubes on a baking sheet and bake until the bread has turned a golden color—approximately 15 to 30 minutes, depending on the oven. Flip the bread over halfway through baking using a spatula to make sure it is evenly baked. Remove from oven and let the bread cubes cool on the baking sheet for 2 hours to give them time to harden if you want to use them right away.
To make stuffing: Preheat the oven to 325°. (I put ours in when the turkey was almost done and finished it for 30 minutes after the turkey came out). Cook the sausage first. Heat a heavy skillet over high heat until hot. Add the sausages and break up the meat using a metal spatula into small pieces. Cook until the meat has browned and has started to caramelize, about 15 to 20 minutes. Set aside. (I put the sausage in a bowl and added the vegetables and oil/butter to the same pan). Add 1/3 cup olive oil, and then the butter. No need for the butter to completely melt before adding vegetables.
Quickly add celery and carrots. Cook about 8 to 10 minutes. Add wine and cook until almost evaporated. Place the bread cubes in a bowl large enough to mix the stuffing when the vegetables are added. Add the cooked sausages, green apples, walnuts and raisins to the bread cubes. Add eggs. Add water gradually, mixing well after each addition. If the stuffing is too dry after adding all of the water (you can also use chicken stock), add more water 1/2 cup at a time.
Add the lemon juice, thyme, kosher salt and cracked pepper and mix well using a wooden spoon. Correct seasoning by adding more salt and pepper if necessary.
Place in a baking pan, cover tightly with aluminum foil. Bake at 325° for 1 hour. I take off the foil for the last 15-20 minutes to get it nice and crunchy!


My family is THANKFUL for: God, Family, and REALLY GOOD "COMFORT" FOOD! Happy Thanksgiving, everyone!


I did not have any pictures of my youngest son from dinner. So, this is a picture taken of both of my boys on Thanksgiving morning. LOL. To read more about this picture (below), go to www.houseoffigsandhoney.blogspot.com

Subscribe to:
Posts (Atom)